Upload Audio & Choose an Action
Use Audio when you already have a recording, demo, vocal, instrumental, or finished mix. You can save the file as a reusable song or use it as the source for a new creation.
Uploading and transforming are separate decisions. The original file stays available when a transformation creates a new result.
Choose the outcome first
| You already have | Choose | Expected result |
|---|---|---|
| A file you only want to store and reuse later | Upload only | A playable uploaded song in your library |
| A melody, demo, or finished song that should sound different | Cover | A new interpretation guided by the source |
| An intro or unfinished song that needs more music | Extend | A continuation from a point you select |
| A vocal or mostly vocal recording that needs music behind it | Add Instruments | A new version with backing instruments |
| An instrumental that needs singing | Add Vocals | A new version with vocals and lyrics |
If your goal is only to remove vocals or split stems, use Vocal Remover & Stem Separation instead.
Upload and check the file
- Open the song creator and switch to Custom.
- Select Audio near the top of the creator.
- Drag a file onto Upload audio, or click the area to browse.
- Wait for the file name, duration, and size to appear in Choose how to use this audio.
- Select Upload only or Create from audio, review the copyright confirmation, and click Continue.
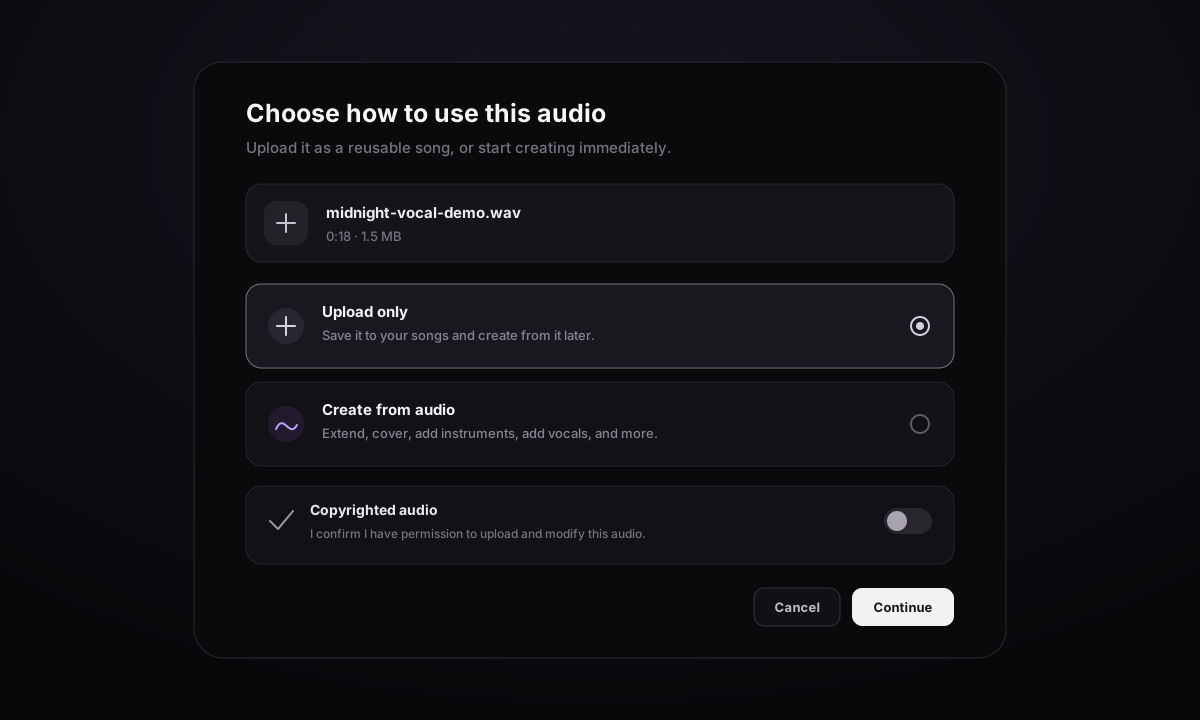
The visible upload area accepts MP3, WAV, M4A, and FLAC files up to 50 MB. Audio must be at least 3 seconds and no longer than 8 minutes. A selected model can impose a shorter action limit: V2 accepts up to 4 minutes for upload-based creation, while MiniMax Cover accepts up to 6 minutes. Upload only can remain available even when the current model cannot transform the full file.
Preview the accepted source from its card before writing any new instructions. Use the trash icon if you selected the wrong file.
Confirm that you may use the audio
Only upload material you are allowed to store and transform.
- Leave Copyrighted audio off for your own recording or material that does not need the copyrighted-upload path.
- Turn it on only when you have permission to upload and modify copyrighted material.
- This confirmation does not obtain a license or verify ownership for you.
- Copyrighted audio uses Upload only, is uploaded first, and currently costs 2 credits as shown in the dialog. You cannot start Cover, Extend, Add Instruments, or Add Vocals from that same confirmation.
When rights or intended commercial use are unclear, resolve that question before uploading. The Commercial License guide explains the difference between rights in a generated result and rights in source material.
Switch actions from the source card
After Continue, the action pill on the uploaded-audio card shows the current choice. Open it to switch between Create Song, Upload only, Cover, Extend, Add Instruments, and Add Vocals.
| Action | Required direction | Useful starting material |
|---|---|---|
| Upload only | No generation fields | A finished mix, demo, or source you want to keep |
| Cover | Style and Title; Lyrics when the selected workflow requires them | A complete musical idea whose style should change |
| Extend | A continuation point, Style, Title, and continuation lyrics unless instrumental | An intro, loop, demo, or song with an unfinished ending |
| Add Instruments | Style, Title, and Exclude styles | A vocal performance or sparse vocal demo |
| Add Vocals | Lyrics, Style, Title, and Exclude styles | An instrumental with room for a lead vocal |
Red asterisks in the current form are the final authority. Changing the action replaces action-specific controls, so review every carried-over field before creating.
Example: add music behind a voice memo
Upload a clear vocal memo, select Add Instruments, and describe the instruments you want to add:
Style
gentle indie folk, fingerpicked acoustic guitar, soft bass,
light drums starting in the second chorus, natural sound

Exclude styles
heavy guitar distortion, loud synth lead, orchestral strings
Keep the request close to what is already in the recording. For the first test, do not change the speed, beat, instruments, and song structure all at once.
Example: add singing to an instrumental
Select Add Vocals and write lyrics that fit the open spaces in the music. Start with short lines, then use Style to say how the singer should sound:
Lyrics
[Verse]
City windows blur into the rain
Your last message flickers on the train

[Chorus]
Stay for the afterglow
There is one more road to go

Style
alternative R&B, soft clear lead singer, quiet verse,
more backing voices in the chorus
If the instrumental already has many sounds, use shorter lyric lines. In Exclude styles, you can remove things you do not want, such as shouting or a large choir.
Example: make a focused Cover
For the first Cover test, keep the original lyrics and change only the music style:
warm 1970s soul, live drums, electric piano, simple bass line,
close lead singer, small-room sound
This makes the two versions easy to compare. After the style change works, make another version for lyric or section changes.
Example: continue an unfinished instrumental
Choose Extend, play the source, and place the marker just before a clean phrase ending. Keep Instrumental on, then describe what should happen next:
same slow electronic style, add a warm bass line,
bring in the drums slowly, then finish with a short outro
Why an action may be unavailable
For Add Instruments or Add Vocals, select V5, V6, or V7. MiniMax can be used for Cover with audio up to 6 minutes. ElevenLabs does not offer these audio actions. The page automatically disables an action when the selected model, file type, or duration cannot use it.
If an action is disabled:
- Check that the source card has playable audio.
- Switch to V5, V6, or V7 for Add Instruments or Add Vocals.
- Compare the file length with the limit shown for the selected model.
- Remove the source and upload a trimmed version if it is too long.
- Choose a different action when the source type does not match the intended result.
Submit and check the result
Before clicking Create, confirm the audio, action, model, required fields, privacy setting, and displayed credit total. The new version appears separately, and the original file is not overwritten.
When the result is ready, listen to the complete track and check:
- whether the new part follows the original rhythm and general pitch;
- whether the join has clicks, silence, or a sudden volume change;
- whether lyrics begin at the intended point;
- whether the action added the correct content instead of replacing useful material;
- whether the ending is complete.
Use More actions on a completed result to download, organize, share, reuse, or move it to Trash.
Fix common upload problems
| Problem | What to try |
|---|---|
| File rejected immediately | Export MP3, WAV, M4A, or FLAC and keep it under 50 MB |
| Duration cannot be read | Export the file again in one of the listed formats and confirm it plays on your device |
| Create from audio is disabled | Shorten the file or choose a model that accepts its length |
| Action disappears after changing model | Return to a supported AIMusicGen model, then reselect the action |
| Add Instruments follows background noise | Use a clearer voice recording with less room noise and no music |
| Add Vocals produces weak placement | Simplify the lyrics, leave space in the instrumental, and clarify the vocal style |
Next, learn how to Extend & Reuse Songs or Replace a Song Section.
