Workspaces & Albums
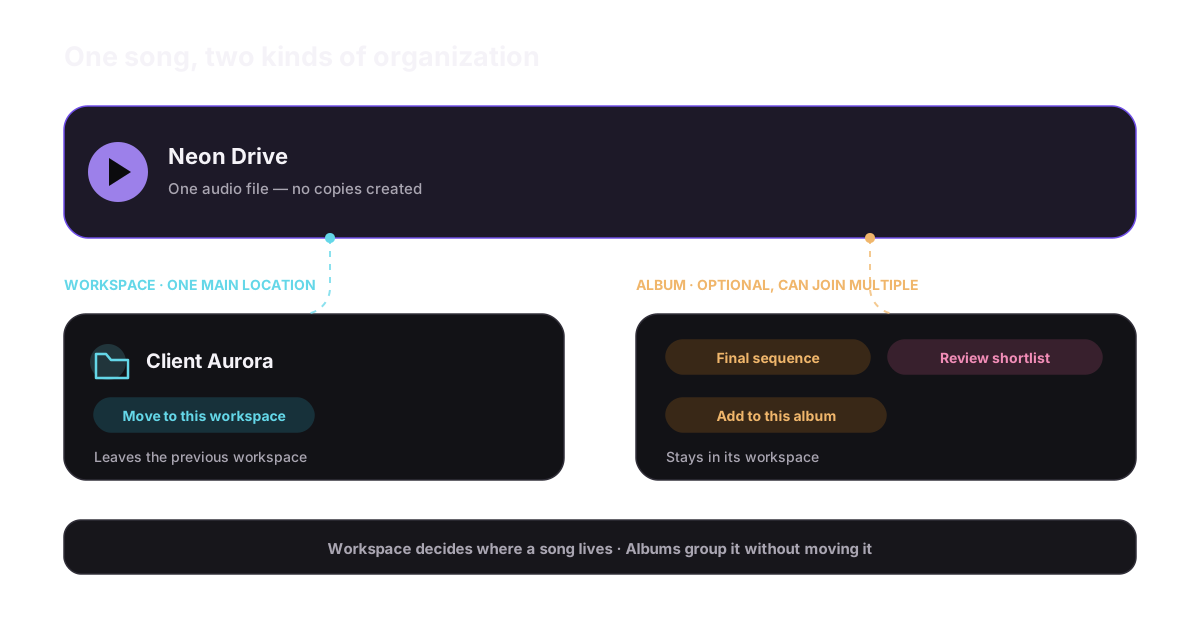
Workspaces and albums organize the same songs in two different ways. A workspace is the song's main home: each song belongs to one music workspace at a time. An album is an additional collection: adding a song to an album does not move it out of its workspace or create another audio file.
Use workspaces to separate active projects or clients. Use albums to assemble a release, shortlist, or listening sequence from songs that may live in different workspaces.
Choose the right container
| Question | Workspace | Album |
|---|---|---|
| What is it for? | The main project or working area for a song | A release, playlist, shortlist, or presentation set |
| How many can contain one song? | One active music workspace | One or more albums |
| What happens when you add or move a song? | The song leaves its previous workspace and moves to the selected one | The song keeps its workspace and gains album membership |
| Where do you create it? | Workspace → New workspace above the song list on the AI Music Generator | Assets → Albums → New album in the Assets library |
| What happens when the container is removed? | Only an empty, non-default workspace can be removed | The album disappears, but its songs remain in their workspaces |
Think of a workspace as the project folder you are currently working in and an album as a saved selection. Neither action duplicates the source audio.
How the default workspace works
AIMusicGen.AI creates one default music workspace for your account. Its visible label is Workspace, and it is selected automatically when you have not chosen another workspace.
- Existing songs without a workspace are placed in the default workspace.
- New songs, uploaded songs, Covers, Extensions, section replacements, and other compatible music results are assigned to the workspace selected when you submit the task.
- The default entry is always displayed as Workspace and cannot be moved to Trash.
- Switching workspaces changes the song list; it does not change or delete any song.
If the list suddenly looks empty, check the Workspace button above it before changing filters or assuming content is missing.
Create and select a workspace
- Open the AI Music Generator and sign in.
- Find the Workspace button above the song list on the right. On a smaller screen, open the Songs tab first.
- Open the menu and choose New workspace.
- Enter a name of up to 100 characters, such as
Client Aurora — September, then select Save. - The new workspace becomes selected immediately. The song list now shows that workspace, and the next compatible music task you submit is assigned to it.
To return to another project, open the same menu and select its name. The check mark identifies the selected workspace.
Rename a project workspace
Select a non-default workspace, open Workspace → Rename workspace, edit the name, and select Save. Renaming changes only the container label. Song titles, audio files, album memberships, and share links are not changed. The default entry continues to display as Workspace, so create a named project workspace when you need a custom label.
Names work best when they identify a durable project rather than a temporary status. For example, use Aurora EP as the workspace and use Favorites, search, or an album for a changing shortlist.
Move a song to another workspace
You can move songs from the Create page's song list or from Assets → Songs.
- Play the row first if several versions have similar titles.
- Open the song's More actions menu.
- Open Organize, then choose Workspace.
- In Move to workspace, select the destination.
- Wait for the Song moved message.
The song is removed from its previous workspace and assigned to the destination. Its audio, title, visibility, favorite status, notes, and album memberships stay with the song. If you moved it from the currently selected workspace, it may disappear from that list immediately; switch to the destination to verify the result.
Moving a song that belongs to an album does not remove it from that album.
Create an album
Albums are created in the Assets library rather than from the song's Organize menu.
- Open Assets from the app sidebar and select Albums.
- Select New album.
- Enter a required Name of up to 100 characters.
- Optionally add a Description of up to 1,000 characters.
- Leave Private album on when the album should be visible only to you, or turn it off when you want the album labeled Public.
- Select Save.
The new album opens immediately. It starts empty; creating an album does not automatically add the songs from your current workspace.
Example structure
Suppose you have three workspaces:
Client Aurorafor all work delivered to one client;Personal sketchesfor experiments;Archive 2026for inactive material.
You can create an album called Aurora EP — final sequence and add the approved songs from Client Aurora. You could also add one licensed interlude from another workspace. Every song keeps its original workspace, while the album becomes the focused release view.
Add songs to an album
Create at least one album first. The Album item only appears in a song's Organize menu when an album is available.
- Open the song in the Create page's list or in Assets → Songs.
- Open More actions → Organize → Album.
- In Add to album, select the destination album.
- Wait for Added to album.
Repeat these steps to place the same song in another album. This adds another membership; it does not copy the song or change its workspace.
To review an album, open Assets → Albums and select its cover. The album view shows its song count and lets you search or filter the songs inside it.
Remove a song from an album
Open the album first, then find the song and choose More actions → Organize → Remove from this album. After Removed from album appears, the row leaves this album view.
This removes only the membership. The song remains in its workspace and in any other albums. Do not use Move to trash when your goal is only to remove a song from one album.
Edit an album and its cover
On Assets → Albums, use the controls on an album card or open the album and select Edit album. You can update its name, description, and Private album setting.
Select Change beside Cover image to choose one of three real cover workflows:
| Cover source | What happens |
|---|---|
| Generate with Visuals | Opens Visuals in image mode with a square 1:1 album-cover prompt based on the album name and description |
| Upload image | Uploads a local image up to 2 MB and replaces the current album cover |
| Choose from Visuals | Shows completed image results; select one, then choose Use selected image |
Creating an image in Visuals and assigning it to the album are separate actions. After the image finishes, return to the album cover dialog, select it, and choose Use selected image.
Remove a workspace or album safely
Workspace
Open the workspace menu and choose Move workspace to trash. The option is disabled for the default workspace, and the server rejects any workspace that still contains songs. Move every song to another workspace first, then try again.
After a non-default empty workspace is removed, the Create page returns to the default workspace or the next available workspace.
Album
On the album card, choose Delete album, review the named album in the confirmation, then select Move to trash. An album can be removed while it contains songs because the songs themselves are not deleted.
The current Assets Trash page lists songs, images, and videos—not workspace or album containers. Treat removing a workspace or album as a container-level action and do not rely on Song Trash to restore it.
Fix common problems
| Problem | Check |
|---|---|
| A workspace is empty after switching | Clear search and Filters, then confirm the selected workspace |
| Move workspace to trash is unavailable | The default workspace is selected; it cannot be removed |
| The workspace removal says only empty workspaces can be deleted | Move every song to another workspace first |
| Album is missing from Organize | Create an album in Assets → Albums first |
| A song disappears after a workspace move | Open the destination workspace; moving changes the active list membership |
| A song disappears from an album | Clear the album search and filters, or add the song again from Organize |
| No images appear under Choose from Visuals | Finish an image generation first; only completed image results are listed |
| A cover upload is rejected | Use an image file no larger than 2 MB |
Next steps
- Find songs with search, filters, favorites, and notes: Play, Find & Organize Your Work
- Publish or export a finished song: Visibility, Sharing & Downloads
- Understand the difference between membership removal and deletion: Trash, Restore & Previous Assets
